This is a simple (not necessarily interesting or technically correct)
explanation of wheel hop:
The suspension and engine are connected to the rest of the car with
flexible, rubber bushings and mounts. This flex kills vibrations, but
it also produces a secondary, unwanted, oscillatory mechanical system.
Normally, this system isn't acted on in such a way that it oscillates.
When launching, the weight transfers to the rear of the car, reducing
traction in the front. As the front tires break traction, the forces
on the suspension and engine also change, setting them into motion.
When the tires grab again, the forces change back the other way, now
applied to a system already in motion. Now we have an oscillating force
applied to an oscillating system, much like a hitting a paddleball.
If you apply force to the paddle to match the natural frequency of
the ball attached to the elastic string, you can keep that system going
all day. With wheel hop, the motion of the system feeds back to the
wheels, causing the oscillating force to sync up with it. This will
also go on all day (until you reduce throttle or the transmission falls
apart).
The solution is to reduce the flex in the rubberband-like motor mounts
and suspension bushings. This page deals only with the motor mounts.
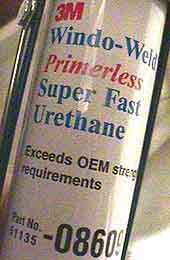
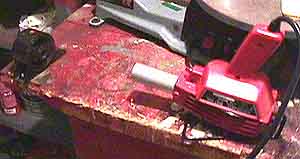
Mike at RRE told sent
me a tube of Windo Weld. This is a cheap way to convert the flimsy
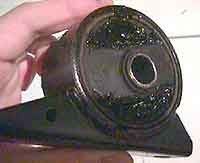
stock mounts (referred to as roll stops in the manual) into solid ones.
This cuts wheel hop and protects the mounts from premature wear, and
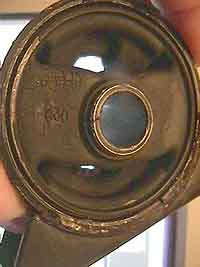
more importantly the transmission. The stock mounts have huge gaps
which allow the center of the mount to move up and down excessively.
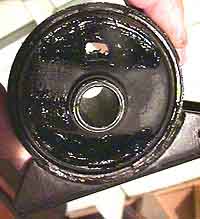
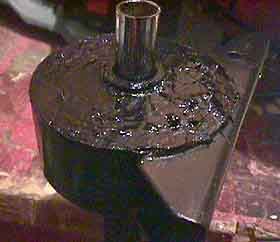
The Windo Weld is a soft, rubbery polyurethene that closely matches
the consistency of the rubber part of the mount, and is a perfect way
to fill those gaps.
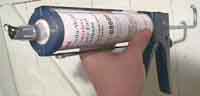
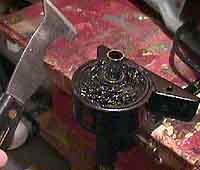
Do this in thin layers! I scrapped the first attempt because I filled
the mount all at once. It would have taken too long to cure - the outside
looks dry, but the inside remains uncured for quite some time. Thin
layers of less than 1/4" thick should cure in about 3 hours each.
A heat gun speeds up the curing process, but too much heat will cause
a volcanic bubbling effect, ruining the job. Do one mount at a time
- you can remove either the front or rear mount without supporting
the engine, but I recommend not removing both.
These instructions are for a 1995-1999 FWD Eclipse or Talon. For other
vehicles, consult your service manual for proper removal of front and
rear roll stops or mounts.
Removing the front mount (easy 5-minute job):
1. Jack up the front (only the front) of the car from the sides.
2. Loosen (but don't remove) the bolt going through the center of
the motor mount
3. Evenly loosen and remove the 2 bolts holding the front motor mount
to the center member.
4. At this point, the mount should not be supporting any weight -
you may want to check if there is a gap between the mount and the
centermember with a piece of paper. If not, you may need another
jack to push the engine up slightly before removing the bolt through
the center but this was not necessary with my car.
5. Remove the bolt going through the center of the mount, and you're
done.
6. To reinstall, reverse the process: Put the bolt through the mount,
evenly bolt the mount to the centermember, and properly torque everything
according to the service manual.
Removing the rear mount: This is much more difficult, because the
bolts are hard to get to. This will go more easily with two people,
especially when working the center bolt, but it can be done with
one person.
1. Take out the battery and tray.
2. Put the car up on 4 stands.
3. Loosen the center bolt going through the mount.
4. Evenly loosen the three bolts holding the base of the mount to
the frame. A long extention will be necessary to get the passenger
side bolt from above. The two driver side bolts are loosened from
under the car.
5. Remove the center bolt.
6. Remove the mount from the car - this is tricky. I found it necessary
to loosen the fuel filter bracket to push the filter out of the way.
Rotate the base of the mount up, and then work it out through the
top by pushing hoses and wires out of the way.
7. To reinstall, reverse the process.
Results:
After modifying just the front mount, the front end was more reluctant
to start hopping. The hop was less severe, but still worse than what
most people will ever experience. The car was more drivable, but
marginally so. I noticed no increase in vibration with just the front
mount filled. Engine movement was also reduced.
After this, I installed Ground Control coilovers with Tokicos and
500/300 lb. Eibach springs. This helped a little, but the main cause
of the hop was still the engine flopping around in the engine bay.
Then I finally had the chance to fill the rear motor mount. Major
difference! Wheel hop is history. If I launch TOO hard, I can purposefully
generate some hop, but it is very mild by comparison. Securing the
engine to the frame made more of a difference than I ever imagined.
The car simply feels more solid now - the way it should, and without
excess vibration. The movement of the engine is something you don't
really notice until it's gone. Wheel hop or not, this is a good modification.
|
|